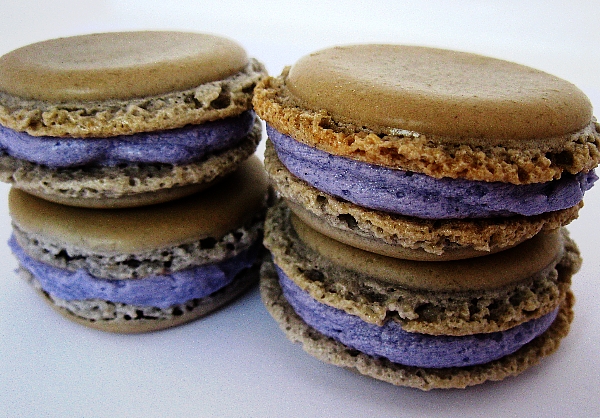
Blackberry buttercream is purple but the shells aren’t!
I’ve got the blackberry macaron blues. I’ve tried twice and both times the shell color isn’t blue, isn’t purple, isn’t black. I wanted “Purple Rain” colored macarons. I love that color. I love that Prince was fond of royal purple. The bottle of gel colorant is that hue. But the results are quite different.
I got the purple buttercream that I wanted. However, by using a violet mica colorant, the shells aren’t purple. Mica colorants are used for soap crafting but the ingredients aren’t harmful as they’re derived from minerals. I was doing this as an experiment and there were no negative results — just a lack of purple!
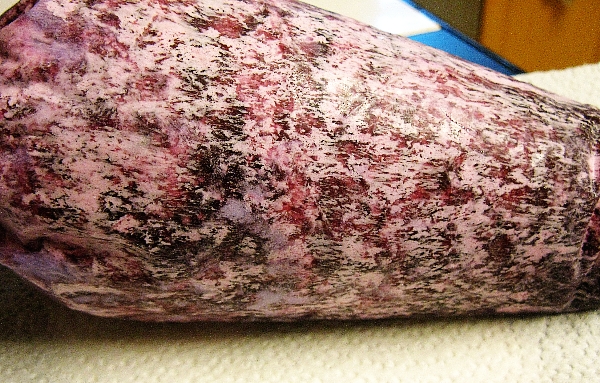
Purple mica colorant
The purple mica has a sheen to it—which is what makes the soap sparkle a bit but won’t do that to a macaron shell.
Purple soap colored with mica. The flecks are real 24K gold leaf
For my second attempt I used a purple gel colorant for the shells. After separating my egg whites and placing them on the counter to age overnight, I emptied out the piping bag with the purple buttercream filling into a mixing bowl. The blackberry jam tasted no different from the strawberry jam I used in my first buttercream. I figured adding fresh blackberries would change the taste. All I did was cook the blackberries in a tiny bit of water and mash up the berries. Then I strained them, poured the seedless remainders into the buttercream, and mixed it with a mixer for several minutes. It was loosely incorporated. But 24 hours later you can see how it’s separating. The resulting mess looks curdled but it’s not. This time the fresh blackberries can be tasted. But the macarons are messy to eat!
Blackberry buttercream fillingThe separation of buttercream and blackberries seen here
The above photo shows drops of blackberry juice. Maybe someone can use this idea for Halloween if you want a blood theme, just use fresh blackberries–or raspberries!
Next week I’ll test a fantastic new fruity macaron recipe and a brand new type of colorant!
Subscribe to: The Discerning Readers’ Newsletter Win free books and a box of macarons! http://eepurl.com/UZbE9
I didn’t think it would take 3 tries to bake lemon macarons but it did, thanks to some brain blips! If you’re trying to make lemon, orange, lime or any other type of citrus macaron which calls for zest, please carefully read this blog and avoid my mistakes!
The first try had nothing to do with the flavor and everything to do with thinking I could add more confectioners’ sugar for a higher yield. Nope, I just ended up tossing the batter in the compost heap.
Attempt #2 failed because I added a heaping tablespoon of lemon zest to the mixture. I’d grated a couple of lemons the day before and put the zest in a glass bowl to dry. The problem was twofold: too much lemon zest and it wasn’t 100% dry. It should have gone in the oven for a few minutes. The zest was pulverized in a food processor but I neglected to sift it as I thought it wasn’t fine enough. Another brain blip!
I added a lot of gel food coloring [in dropper bottle] and still only got a pale yellow color rather than the daffodil yellow I was hoping to achieve. The macaronage went well and I was able to pipe 68 shells on 3 different trays. At 12:40 I’d piped the first two parchment-lined trays. I wasn’t able to put one in the oven until 2:28—and the day was warm and sunny with average humidity. 90 minutes of drying time was highly unusual. The problem became apparent when the first tray emerged from the oven with yellow-brown macarons with NO feet. Ugh! I shouldn’t have used the center rack, either.
Flat & footless macarons
While I managed to put together 34 macarons, none of them looked good, especially the last tray with the freehand piped macs on the silpat. They were as flat as Oreo cookies and the next day when I bit into one, the filling spewed out onto the plate. Compost heap for those macs.
Freehand piping’s not perfect but is improving
My third batch of lemon macarons behaved nicely! Drying time took 30 minutes, I didn’t add any lemon zest and when I peeked into the oven after 9 minutes I saw pretty yellow shells with feet!
Lovely Lemon Macarons just out of the oven
78 shells, none cracked, all with feet, and even the silpat freehanded macs had smooth undersides—no visible hollows. Easily plucking them off the mat was the highlight to a successful macaron baking afternoon.
TIME SAVING TIP! Mix the almond flour and the confectioners’ sugar together the night before. This should be the fourth time you sift the almond flour but only the first time for the powdered sugar. They should be sifted into a large bowl so that it’s easy to combine them with either a whisk or a fork. Cover the bowl with cling wrap and when you make the macarons the next day, that step is already taken care of. I discovered this time saving method when I was separating the egg whites. I tend to age the eggs overnight rather than for several days. My theory is that as long as the eggs are at room temperature the meringue will turn out fine.
The following recipe is in grams as weighing ingredients is more precise. While similar to my pink lemonade macarons, the main differences are weighing the amounts and using 3 egg whites. For the filling, weighing isn’t necessary, but an increased amount of lemon curd gives it a tangy taste. I also recommend vanilla bean paste in the filling for its rich flavor.
Lemon Macaron Shells
100 grams almond flour
200 grams powdered sugar
3 large egg whites [room temperature]
50 grams granulated sugar
Yellow gel food coloring
Pinch of salt
Oven Temperature: 300 degrees
Time: Approximately 16 minutes
* Line 3 baking sheets with parchment paper or silpats. If the sheets are thin, double them up. You’ll also need a pastry/piping bag with a large round tip ready before you begin.
* Sift powdered sugar with the almond flour. Large grains that don’t make it through can be thrown away or used as a skin exfoliator.
* Whisk the sugar and flour to make sure it’s fully blended.
* In a stainless steel or glass bowl, beat the egg whites until foamy like a bubble bath before adding the salt. Then add granulated sugar in 3 batches. Start at a low speed and gradually increase the speed. When finished, the mixture should have stiff peaks. Add color last, but only whip for the briefest amount of time to mix in the color.
* Add dry ingredients to the meringue in 2 batches using a spatula. Fold until the mixture comes together, scraping the sides and flip batter over. When the sugar/flour mixture is blended, the batter will be easier to mix and will look shiny. Lift the spatula and see how quickly batter falls in “ribbons” from the spatula. A ribbon of batter dropped into the bowl should merge with the rest of the batter in 20-30 seconds. Another test is to “write” the number 8 with the batter.
* Add tip to piping bag and then twist near the bottom to prevent any mixture from escaping. The tip should face upwards and that also helps keep the mixture in the piping bag as you place it in a cup and form a cuff over the rim so it’s easy to add the batter.
* Pour batter into piping bag. Twist the top of the bag and untwist the bottom, gently pushing the just-poured batter toward the bottom. You’ll remove any excess air that way.
* Pipe the batter onto the parchment or silicone mat. With parchment, you can use a template.
* Pipe batter on the parchment-lined baking sheets in 1.5-inch circles. Keep the batter inside circles if using a template.
* Rap baking sheet several times on the counter. This will further flatten the macarons, and remove air bubbles. Place a towel on the counter to lessen the noise!
* Preheat oven to 300 degrees Fahrenheit.
* Allow macarons to sit for 30-60 minutes until a film forms. Lightly touch a macaron and if no batter clings to your finger then it’s dry and ready to be baked.
* Bake for approximately 16 minutes. Use either the center rack or the one just below it. The tops should be firm and glossy and the bottoms of the shells should have formed “feet” or frills at the bottom. The risen macarons should be firm with the slightest amount of give. When done, the cookies can easily be removed from the parchment or silpat.
* Remove from oven, place cookie sheet on a wire rack or flat surface and let cool completely.
Lemon Curd Buttercream Filling
1/4 cup butter, softened [President, Plugra and Kerrygold are all excellent brands]
1.5 cups confectioners’ sugar
2 Tablespoons heavy cream
4 tablespoons lemon curd
1 teaspoon vanilla bean paste
Instructions:
Blend the softened butter with half of the powdered sugar. Add the cream, lemon curd and vanilla. Gradually add the remaining powdered sugar until the filling is the desired consistency. The filling should be stiff enough to remain on the cookie but not so hard as to crush the shells. Spoon or pipe the filling onto the row of macaron bottoms and cover with a top.
I had a bag of organic California pistachios and decided to make macarons with freshly ground pistachio flour. So, I read how the flour was made and spent several hours going through the steps. The pistachio nuts were removed from the shells, boiled in hot water to remove the jackets, dried out in the oven, and then ground and sifted. Adding some powdered sugar to the food processor [or spice grinder], prevented the pistachios from turning into pistachio butter. This was the same process for making almond flour out of whole or sliced [preferably blanched] almonds. And this was why I’ll pay about $12 per pound for finely sifted almond flour; which I still have to sift four more times!
Pistachio flour
After all that sifting, the baker encountered whipping the meringue, the exacting macaronage process, piping round discs of macaron batter, and then getting those delicate little cookie shells in and out of the oven.
Making the buttercream filling is the easy part.
I thought I’d spend part of my Saturday afternoon baking macarons with aged egg whites that were weighed out the night before. The recipe called for 100 grams of egg whites. The scale read 189 grams. I double checked it, subtracting the weight of the small glass bowl yet again. Still over 178 grams. So I subtracted more than half the egg whites until the scale read 109 grams. Okay, that was close enough.
The ingredients for the shells & most of the equipment
But something didn’t seem right when I mixed the egg whites and added the sugar. The whites weren’t getting glossy. Peaks weren’t forming. Almost 18 minutes later, I had something that seemed like meringue but as soon as I added half the flour/sugar mixture and worked up a sweat trying to incorporate the ingredients, I knew I had a failed batch. The batter would be dumped in the compost heap instead of poured into a piping bag.
My first failure that never made it into the oven. I’d read of that happening and wondered what had gone wrong. Now I knew.
I’d left 3 eggs on the counter, along with the butter I’d use for the filling; some foresight in case I needed more egg whites. I thought I’d try the empty plastic bottle egg separation method I’d seen on a couple of YouTube videos. It looked so easy, but I accidentally jammed the top of the bottle into the yolk and there went that egg. I’d be having an omelette for supper that night! I had two eggs left and fortunately another dozen in the fridge. I used the warm water soak method to get them to room temperature. That took about 10 minutes.
Pistachio shells resting
I colored the batch green because of the pistachio flour. It also contained that marvelous vanilla bean paste which gave it more intense flavor and added interest to the shells. The shells came out flat but with feet. The surface was incredibly smooth and shiny, even with the added spots resulting from the two types of nut flour and the vanilla bean specks.
My day of macaron baking began at noon and I finished cleaning up just before 7:00 PM. However, I had 35 completed macarons with light brown vanilla bean filling that tasted very rich and scrumptious.
Want the recipe for vanilla bean shells? The amounts are the same except you can use 55 grams of almond flour and 55 grams of pistachio flour, which is what I did. You won’t taste the difference but you’ll get a more speckled effect with pistachio flour.
Pistachio shells just out of the ovenClose-up of shell — very smooth & shiny
Pistachio Vanilla macarons ready to eat!
NEXT WEEK: Let’s talk about lemon macarons!
Subscribe to: The Discerning Readers’ Newsletter Win free books and a box of macarons! http://eepurl.com/UZbE9
Time to try the metric system! I used my trusty little digital scale that I bought for soap crafting. It only measures up to six pounds but does grams and ounces.
I’m a fan of vanilla as I don’t think it’s plain. Vanilla’s a spice, it comes from an orchid and grows in the tropics. It’s not white, it’s black. And I finally tried vanilla bean paste. I highly recommend it. I used Nielsen-Massey vanilla bean pastebecause I wanted the tiny seeds and didn’t have to scrape them out of a vanilla pod. I was also curious to try the paste, as I’d read several online reviews from bakers of all levels of expertise citing it was very flavorful. According to the Neilsen-Massey website: “Due to its thick consistency, similar to molasses, this culinary paste enables you to add more delicious vanilla flavor without thinning out your batters or sauces. It’s also ideal for recipes, such as crème brûlée and ice cream, in which you want to add the enticing visual flair of vanilla seeds.” As macaron batter can be finicky, I didn’t want to take a chance in adding vanilla extract and I wanted the vanilla seeds. Win win!
Now, I was supposed to precisely weigh the ingredients but the three eggs didn’t weigh 110 grams but 88 grams. I figured I’d take a chance and I’m glad I did because this batch turned out fine. In fact, by using three rather than two eggs, I ended up with 53 shells. Since I had so much batter, I used a silicone mat on top of two warped cookie sheets. I’d read not to use warped cookie sheets but it didn’t make a difference—the shells came out just fine. So fine that they were effortlessly removed from both parchment and silicone surfaces! That was another first. What’s as good as a macaron with feet? Shells that don’t have to be scraped off with a spatula!
The mint color is seen in the back
When I added the vanilla bean paste right after the blue gel colorant, the black seeds were apparent and the blue changed to mint green. After sitting in the fridge overnight, the shells returned to robin’s egg blue again!
Vanilla bean macaron with strawberry buttercream filling
TIPS: Sift the almond flour three [3] times before you make the macarons. The fourth time is when you blend it with the confectioners’ sugar. This is why macarons average $2.00 each – they are labor intensive. Patience is needed for crafting these fancy French cookies.
Sifting almond flour isn’t tons of fun but the more you sift, the smoother and shinier your finished macarons will be. [Check out the one to your left].
French Vanilla Bean Macarons
110 grams ground almond flour
Front to back: almond flour, confectioners’ sugar, blue gel & vanilla bean paste
200 grams confectioners’ sugar
100 grams egg whites (3 eggs)
1 teaspoon vanilla bean paste [or extract]
50 grams granulated sugar
3 drops blue gel colorant
Pinch of salt
Oven temperature: 300
Instructions:
* Line two baking sheets with parchment paper or a silpat. If the sheets are thin, double them up. Macarons are sensitive to heat so they need to be baked on a durable tray that has lots of insulation. You’ll also need a pastry/piping bag with a large round tip ready before you begin.
* Sift powdered sugar with the almond flour. Large grains that don’t make it through can be thrown away or used as a skin exfoliator. I discovered this when I washed the equipment by hand the first time!
* Whisk the sugar and flour to make sure it’s fully blended.
* In a stainless steel or glass bowl, beat the egg whites until foamy like a bubble bath before adding the salt. Then add granulated sugar in 3 batches. Start at a low speed and gradually increase the speed. When finished, the mixture should have stiff peaks. Add color last, but only whip for the briefest amount of time to mix in the color.
* Add dry ingredients to the meringue in 2 batches using a spatula. Fold until the mixture comes together, scraping the sides and flip batter over. When the sugar/flour mixture is blended, the batter will be easier to mix and will look shiny. Lift the spatula and see how quickly batter falls in “ribbons” from the spatula. A ribbon of batter dropped into the bowl should merge with the rest of the batter in 20-30 seconds. Another test is to “write” the number 8 with the batter.
* Add tip to piping bag and then twist near the bottom to prevent any mixture from escaping. The tip should face upwards and that also helps keep the mixture in the piping bag as you place it in a cup and form a cuff over the rim so it’s easy to add the batter.
* Spoon batter into piping bag. Twist the top of the bag and untwist the bottom, gently pushing the just-poured batter toward the bottom. You’ll remove any excess air that way.
* Pipe the batter onto the parchment or silicone mat. With parchment, you can use a template.
* Pipe batter on the parchment-lined baking sheets in 1.5-inch circles. Keep the batter inside circles if using a template.
* Rap baking sheet several times on the counter. This will further flatten the macarons, and remove air bubbles.
* Preheat oven to 300 degrees Fahrenheit.
* Allow macarons to sit for 30-60 minutes until a film forms. Lightly touch a macaron and if no batter clings to your finger then it’s dry and ready to be baked.
* Bake for 12 minutes. The tops should be firm and glossy and the bottoms of the shells should have formed “feet” or frills at the bottom. The risen macarons should be firm with the slightest amount of give. If it wobbles, they require another minute or so. When done, the cookies can easily be removed from the parchment.
* Remove from oven, place cookie sheet on a wire rack or flat surface and let cool completely.
Yolanda Carter is preparing for Valentine’s Day as romance and macarons are baking in Yolanda’s Yummery. But things take a dark turn when the body of someone she knows is found dead in a nearby dumpster.
Teaming up with Detective Winston Churchill to find the killer, some employees are suspects, including Yolanda’s boyfriend, Nigel Garvey.
A February 14 appearance on the TV show, America’s Best Bakeries, and the yummery’s upcoming first anniversary are overshadowed as she strives to run her business and help the detective.
Macarons of Love also contains recipes for French macarons and cupcakes.
THE EXCERPT
As the sun had finally shown its rays and brightened the day, she was about to return to the kitchen when the front door opened. There stood a handsome young man in his mid-twenties wearing an elegant hunter green jacket and tan corduroys. He beamed upon seeing her and she noticed that he was the one to initiate the first move by rushing across the store and behind the counter, where he greeted her with a big hug and kissed her gently on the lips. She felt the strong attraction and stared into his penetrating dark eyes. Beneath the light of the shelving units filled with bagged and boxed sweets, she saw that his natural golden brown wavy hair had more gold than brown. He had been in Miami for three days, which explained the difference.
“I missed you, Nigel,” she said as a way of greeting her boyfriend.
“Darlin’, you know I missed you. But I can’t wait to spend tomorrow night with you. There’s something very important I want to discuss with you—after we see ourselves on America’s Best Bakeries, of course!”
My quest for baking the perfect chocolate macaron continued. They needed to have feet but also be smooth and shiny. By adding less cocoa powder, my second bath was easier to mix. The egg whites “aged” overnight, about 12 hours. But I slightly underwhipped them, which was a first. After the macaronnage, I added the batter to the piping bag and closed the top with a rubber band to avoid spillage. It worked, although by the time I piped the last shell, the remaining batter was threatening to ooze out of the top.
Just piped chocolate macarons
The macarons didn’t set up right away – I had to wait about 30 minutes. Later, I realized that both trays should have rested for at least 45 minutes.
This time, the oven temperature was lower, 300 degrees. I’e since learned that chocolate needs to bake around 350 degrees. Also, the baking time should’ve been longer. One tray was in the oven for 19 minutes and the other 20. Afterwards, I realized they could’ve baked another two minutes longer in both cases because I wasn’t able to easily remove them from the parchment paper. However, using 20/20 hindsight, chocolate macarons should bake for about 12 – 14 minutes at 350 degrees.
While both trays showed macarons with feet, they were in the small side and the shells were hollow. At first, the macs looked like they’d have smooth, glossy tops, but after they emerged from the oven they deflated a bit and had irregular shaped tops.
Out of the oven — a bit underbaked
Unlike the first batch of chocolate macarons, the texture was lighter and airier – not like brownies or biscotti.
The chocolate ganache filling was easy to make. I chopped up a Valrhona bar [71% cacao content] trying not to eat any of it. Note: next time I’ll try the Valrhona 46% feves! For 50 seconds, the heavy cream went into the microwave and when poured over the chunks the melting began. I whisked it for a few strokes and then added the room temperature butter and vanilla extract. Soon it was successfully mixed and sampled. Way better than the first batch. Nothing like using a high quality chocolate bar, heavy cream and imported butter! Yes, I could taste the difference between this and the previous batch made with chocolate chips. The richness was so apparent.
Chocolate macarons with ganache filling
Due to being underbaked, the shells stuck to the parchment and I used a spatula to remove them. Some of them were really cracked and messy looking but I managed to salvage them into sloppy and unphotographable macs. They tasted good when consumed that day. However, the next day and the day after that the macarons tasted much better.
NEXT WEEK: More adventures as I bake scrumptious French Vanilla Bean Macarons.
Subscribe to: The Discerning Readers’ Newsletter Learn more about upcoming releases and win free books & gifts!http://eepurl.com/UZbE9
Before baking the macarons, I sifted the almond flour three times and poured it into an airtight container. Now, every time I make macarons, I only have to sift the flour and powdered sugar together once, and whisk the two ingredients in a bowl and set it aside. So much sifting is done to ensure that your shells are smooth and shiny.
When I whipped the [room temperature] egg whites, I added the pinch of salt with the granulated sugar at the foamy midway point. Four minutes later, I had that satiny texture of egg whites that had reached their peak. Then I added two drops of pink gel for a baby pink color.
The flour/sugar mixture was added in two stages and this time I counted how many times it was folded: 63. The texture was just right and I was cautiously optimistic, as I poured the batter into the piping bag. My first few macarons were round and all was going well until I felt something wet on my hand. Ooops, I’d been holding the bag wrong and it was leaking out the top. But I kept at it and wound up with a grand total of 52 shells.
My Pink Lemonade Macarons
30 minutes later, the macarons went into a 300-degree oven. Instead of using the center rack, I opted to use the one just below it. This time I turned the tray eight minutes into the baking. There they were: FEET!
They baked for 19 minutes and when I pulled the tray out I saw 26 macarons shells with feet. I did a happy dance, and added the second tray. Meanwhile, I began making the “lemonade” buttercream filling. Actually, it was flavored with Trader Joe’s lemon curd. I used the strawberry buttercream recipe and substituted lemon curd for the strawberry jam.
All was going well until I added the powdered sugar. It flew out of the bowl, on the counter, stove, floor, me…the bowl was too small! Next time I’d mix the softened butter first until creamy and then very slowly add the powdered sugar. More time consuming but no cloudbursts of sugar that way.
Due to using naturally yellow butter and lemon curd, I didn’t need to add color, but I did: 5 drops which didn’t significantly change the color. The taste was a sweet and tart blend that I adored. If you adore lemon, try the following recipe. Let me know how it turns out and feel free to ask any questions or make any comments!
Pink Lemonade Macaron Shells
1 cup powdered sugar [confectioners’ sugar or icing sugar]
¾ cup almond flour [sift 3 times]
4 Tablespoons granulated sugar
2 egg whites [room temperature]
2 drops pink gel colorant
Pinch of salt
Serving size: 52 shells or 26 macarons [approximately]
Equipment:
Stand or hand mixer with whisk attachment
2 – 4 large baking sheets
Parchment paper or silpat mat
Large sieve or flour sifter
Pastry/piping bag with large round tip
Measuring cups/spoons/stainless steel or glass bowls
Silicone or rubber spatula
Large cup or glass to hold piping bag
* Line two baking sheets with parchment paper or a silpat. If the sheets are thin, double them up. Macarons are sensitive to heat so they need to be baked on a durable tray that has lots of insulation. You’ll also need a pastry/piping bag with a large round tip ready before you begin.
* Sift powdered sugar with the almond flour. Large grains that don’t make it through can be thrown away or used as a skin exfoliator. I discovered this when I washed the equipment by hand the first time!
* Whisk the sugar and flour to make sure it’s fully blended.
* In a stainless steel or glass bowl, beat the egg whites until foamy like a bubble bath before adding the salt. Then add granulated sugar in 3 batches. Start at a low speed and gradually increase the speed. When finished, the mixture should have stiff peaks. Add color last, but only whip for the briefest amount of time to mix in the color.
* Add dry ingredients to the meringue in 2 batches using a spatula. Fold until the mixture comes together, scraping the sides and flip batter over. When the sugar/flour mixture is blended, the batter will be easier to mix and will look shiny. Lift the spatula and see how quickly batter falls in “ribbons” from the spatula. A ribbon of batter dropped into the bowl should merge with the rest of the batter in 20-30 seconds. Another test is to “write” the number 8 with the batter.
* Add tip to piping bag and then twist near the bottom to prevent any mixture from escaping. The tip should face upwards and that also helps keep the mixture in the piping bag as you place it in a cup and form a cuff over the rim so it’s easy to add the batter.
* Spoon batter into piping bag. Twist the top of the bag and untwist the bottom, gently pushing the just-poured batter toward the bottom. You’ll remove any excess air that way.
* Pipe the batter onto the parchment or silicone mat. With parchment, you can use a template. Stay inside the lines as the batter will spread and flatten a bit.
* Pipe batter on the parchment-lined baking sheets in 1.5-inch circles.Keep the batter inside circles if using a template.
* Rap baking sheet several times on the counter. This will further flatten the macarons, and remove air bubbles.
* Preheat oven to 300 degrees Fahrenheit.
* Allow macarons to sit for 30-60 minutes until a film forms. Lightly touch a macaron and if no batter clings to your finger then it’s dry and ready to be baked.
* Bake for 16 -18 minutes. The tops should be firm and glossy and the bottoms of the shells should have formed “feet” or frills at the bottom. The risen macarons should be firm with the slightest amount of give. If it wobbles, they require another minute or so. When done, the cookies can easily be removed from the parchment.
* Remove from oven, place cookie sheet on a wire rack or flat surface and let cool completely.
Lemon Curd Buttercream Filling
1/4 cup softened butter [use a high quality butter like President or Kerrygold]
1 1/2 cups powdered sugar [confectioners’ sugar or icing sugar]
2 Tablespoons heavy cream
3 tablespoons lemon curd
1 teaspoon vanilla extract or vanilla bean paste
5 or so drops yellow gel color [optional]
Whip butter for about 2 minutes before adding some of the powdered sugar. Add the cream, lemon curd and vanilla. Gradually add the remaining powdered sugar until the filling is the desired consistency. Add colorant last.
Pair the shells according to size. Spoon or pipe filling onto one side. Gently add the other side. If using a piping bag, start in the center by doing a swirl until you reach near the edges but not right at the edges. You don’t want to overfill them and make a mess with leaking buttercream filling. Gently add the top shell and give it a twist of about a quarter turn to make sure the shells are nicely lined up.
Store your macarons in an airtight container and put in the refrigerator. They should last about a week. Macarons taste best at room temperature, so remove from the fridge about an hour beforehand.
My goal: to imitate the beloved Laduree Chocolate Macaron!
I’ve tasted chocolate macarons from Trader Joe’s and Laduree. To your left is a photo of what a true chocolate macaron looks like.
For my chocolate macarons, I used a different ratio of ingredients, different filling and different oven temperature from my other three batches. What could go wrong? Or right?
I used a good brand of cocoa powder: Divine. Yes, it smells and tastes as good as its name so I thought that was perfect for my favorite flavor.
Major differences included changing the oven temperature, using the center rack, and adding salt to the egg whites. That last step resulted in a longer time to get the first signs of froth and the finished meringue texture.
Already dry batter
This batter was unlike the others as it was much thicker. I probably used too much cocoa powder. It had only been sifted once, when added with the sugar and almond flour. Whatever it was, this batch was very difficult to mix and I got so tired I just stopped. As soon as it was awkwardly piped onto the parchment paper, it was already dry. With my other three batches, when first touched, some of the batter stuck to my finger. With this batch, I was able to touch the batter and feel a thin film had already formed! That was a first. It was the complete opposite of the previous week’s 90-minute wait for the shells to get that film. Still, I had to wait for at least 30 minutes while I preheated the oven and made my chocolate ganache filling.
That’s when the fun began. I used the standard unsweetened Baker’s Chocolate. Instead of opting for the double boiler, I used a microwave to melt the heavy cream, then pour it onto the shredded chocolate, melting it that way. The recipe also called for butter and vanilla extract. It mixed up well with a whisk. I added it to the piping bag and let it rest [sideways] on the counter to cool off.
FEET!
Meanwhile, I’d discovered something amazing going on with the macarons – at the seven-minute mark I switched on the oven light and looked through the window – feet! The macs were all forming feet. “I’ve got feet!” I shouted. “Feetsies! I’ve got feet! Feet don’t fail me now!”
And they didn’t! I was able to turn the tray and see the feet up close. I impatiently waited for them to finish. When they were placed on a cooling tray, I admired the little frills that surrounded each round and semi-round shell. Later, I’d easily slide them off and note very little residue on the parchment paper. There were no hollows; each shell was solid on the bottom.
But the tops looked a little rustic. No shiny and smooth finish. Oh well, can’t have everything.
Time to pipe the ganache. Nothing happened. Some butter had separated and solidified at the edge of the nozzle. The ganache was stuck inside. Squeezing from the top, even shaking it, that dark brown filling wasn’t budging.
Time to make another batch of ganache. I followed the same directions, using Nestle Toll House Semi-Sweet Chocolate Mini Morsels. They melted even faster and the resulting ganache was like thin syrup. I put it in the fridge. Two hours later, it was still the same texture, only colder. I melted a small amount of morsels in the microwave and then had something that could go into a piping bag and become the filling for the nicely chocolatey brown shells.
The macarons looked and tasted like brownies with commercial chocolate rather than a French delicacy I’d hoped to make. 24 hours later, the macs tasted no different, definitely like brownies with semi-sweet chocolate fudge filling.
But at least they had feet!
Rustic and bumpy looking macarons. Also seen: the 3rd batch of strawberry buttercream macs sans feet.
NEXT WEEK: More adventures as I bake Pink Lemonade Macarons.
Subscribe to: The Discerning Readers’ Newsletter Learn more about upcoming releases and win free books & gifts!http://eepurl.com/UZbE9
The macaron baking saga continues as I want to test the King Arthur “super finely ground” almond flour I’d found for a dollar less at Walmart. I also wanted to try a strawberry buttercream filling because I love strawberries and the idea of a buttercream filling seemed decadent to me. I’d written about them in my books but in fact had never made buttercream frosting/filling from scratch. I’ve used containers of Duncan Hines and Betty Crocker frosting. Well, they weren’t actually buttercream, they were called frosting, had a long shelf life, were always at room temperature, and were spread with a knife. At least in my experience they were. While all frostings or buttercreams contain high amounts of sugar, the store-bought variety had vegetable shortening instead of butter so they didn’t contain butter or cream.
At first, I thought the super finely ground almond flour only needed to be sifted with the powdered sugar. Wrong! I ended up sifting it twice. I left the two eggs out overnight, thinking I’d separate them before I made the macarons. When separating the whites from the yolks, some of the yolk dropped into the egg white bowl. Macaron baking experts declared that a NO as fat wasn’t good for macs. So I scrounged around online until I found a website where the author claimed an egg could be aged in the microwave for ten seconds.
A glossy meringue
Most eggs contain a high percentage of water in the whites. When aged, extra water evaporates. Separate the white from the yolk and cover with cling wrap with a small slit to allow for evaporation, then place in the refrigerator for 24-36 hours. You can also leave it out overnight or for about 12 hours if the bowl is covered with a paper towel. The eggs must be room temperature if you want them to whip into a fluffy meringue.
This was my worst batch yet, due to the egg problem. The egg didn’t age or do anything other than maybe warm up a bit. Unlike the sunny day where I made my first batch, the weather had gone from early morning sunshine to mid-afternoon humidity and rain. It was a challenging four hours due to:
* Waiting 90 minutes for the shells to dry
* Undermixing the batter
* Clumsy piping of the batter
* Forgetting to remove the paper templates from the baking sheet [see 2 photos below]
* NO feet
On the bright side:
* 1 more drop of coloring made the magenta even brighter
* Remembering to make a cuff with the pastry bag
* Lowering the temperature of the oven
* Making the best strawberry buttercream filling I’d ever tasted
* Able to pipe the buttercream filling onto the macarons
Before going into the oven–note paper template
After being removed from the oven — note paper template
¼ cup room temperature Unsalted butter [use a high-quality brand like President or Kerry Gold]
1 ½ cups powdered sugar
2 Tablespoons heavy cream
4 Tablespoons high quality strawberry jam
1 teaspoon pure vanilla extract OR vanilla bean paste
I want to emphasize the importance of using the best and highest quality ingredients in your buttercream filling as you will taste them! If you can use fresh strawberries or strawberry jam/spread that you’ve made, that would be excellent. I used a fruit spread that was sweetened with natural fruit juice and fruit pectin. There are many high quality types available in your grocery store, health food store, farmers market, etc. that DON’T contain high fructose corn syrup.
Here’s a list of preferred ingredients: strawberries, sugar, cane sugar, concentrated lemon juice, and fruit pectin.
INSTRUCTIONS: If using a stand mixer, add the butter to the bowl and mix for about 30 seconds, and then add half the powdered sugar.
If using a hand mixer, make sure you have a LARGE bowl and mix the butter first, then add half the sugar.
When the mixture is smooth, add your wet ingredients: cream, jam and vanilla. Once mixed, it’s time to add the remaining powdered sugar.
The mixture should be smooth and firm but not too firm that it would crush the delicate macaron shells.
If you pipe onto the shells, it’s recommended that you use a large, plain tip, Wilton size 10.
Start by piping in the center and doing a swirl until you reach near the edges but not right at the edges. You don’t want to overfill them and make a mess with leaking buttercream filling. Gently adding the top shell and giving it a twist of about a quarter turn is an easy way to make sure the shells are nicely lined up.
Finished macaron — sans feet!
NEXT WEEK: More adventures in macaron baking! I test my first batch of chocolatemacarons with chocolate ganache filling!
3 French macarons from MacarOn Cafe–my inspiration!
Making a pound cake from scratch is the most advanced baking I’ve ever done. This dessert contains the most basic ingredients found in your pantry and fridge: eggs, butter, flour, sugar, vanilla extract and baking powder. As long as you have a hand or stand mixer and measure your ingredients correctly, it’s not difficult to mix and bake.
Macarons also require few ingredients: two types of sugar, egg whites, almond flour, and color. That’s it as far as the cookies, a/k/a shells go. The fillings can be diverse: readymade jams or jellies, caramel, Nutella, butterscotch, lemon or lime curd, etc. You can make your own whether it’s buttercream, chocolate ganache, or a jam/fruit spread.
I’d tasted macarons a few times and loved them. They were decadently sweet and rich. From an Etsy store, I ordered an array of pastel colored macarons that were photographed for the cover of my novella, Sweet Dreams.
I needed a picture for the cover of my forthcoming sweet romance/cozy mystery, Macarons of Love, #4 in the Yolanda’s Yummery series. So I bought macarons in various colors and flavors. Average price: $2.25 each. I took 300+ pictures and they were good, not great. I cherished each macaron and decided that having these delicacies handy whenever I wanted them was a very appealing idea. Even if they didn’t turn out looking great, I’d get a better education about the art of baking macarons and would understand my characters even more. I had most of the ingredients and equipment, I reasoned. Well, not almond flour, but sugar was in the cupboard and fresh eggs in the fridge. I’d watched more than a dozen how-to videos on YouTube. I read numerous blogs, many of them showing step-by-step directions. Some bakers claimed they were easy to make; other bloggers despaired of ever being able to create them. One confessed that several batches never even made it to the oven.
I spent $12 for one pound of almond flour! This is one of the reasons why macarons aren’t cheap. I also learned that almond meal, almond powder, and almond flour are the same thing. Only when making macarons, you needed to sift or sieve it. The more you sift, the finer it gets, the better lookin’ those macarons.
Macarons weren’t spooned onto a baking sheet—they were piped on. Piped with one of those piping or pastry bags? I thought that was for decorating cakes or cupcakes. My experience with a piping bag? Zip. I couldn’t just neatly spoon them on? Nope.
Separating eggs and whipping the whites into a meringue didn’t seem too difficult to someone who’s whipped thousands of gallons of shea butter. But there’s a difference between the two ingredients: shea butter can’t be overwhipped, egg whites can. I also had a major oopsie that first day after picking up the egg and instead of separating it the entire egg splatted into the bowl. Great, I’d have to wait another 24 hours so the egg would be aged enough for high quality macarons. At least that’s what many of the bakers suggested.
Since I knew my piping skills were nonexistent, I had some foresight: I made a template the size of the baking sheet and had 1.5” circles neatly spaced on the back of the paper that was adhered to the baking sheets.
I put the required amount of almond flour [Bob’s Red Mill] through a small sieve. Correction: I attempted to sieve the flour. Thirty minutes later, I’d managed to get about 1/8 of a cup from sieve to mixing bowl. I grumbled about how time consuming it was, recalling people on videos doing it in seconds. I tried smacking the sieve and just spilled more flour. The spatula didn’t work. My fist, wanting to punch it through… nope, that sieve was too small.
I interrupted my macaron making “festivities” and drove to the store to buy a larger sieve. Finally, the almond flour was able to make it through the larger size mesh, as did the powdered sugar.
Meanwhile, I had no difficulty whipping the egg whites, granulated sugar, and adding the magenta gel color.
Folding the flour and sugar meant the dry ingredients had to be sifted again. Good thing I didn’t have to use that mini sieve. The egg whites would’ve deflated or whatever happens to old egg whites. Macaronnage is the term for gently folding the dry ingredients into the egg whites which results in a batter that’s not too stiff and not too runny. There are ways of determining when it’s done such as counting the number of strokes to testing the batter to see how it falls from the spatula—the term molten lava is frequently used. Well, I guessed it was like molten lava because my arm was starting to feel like it with all that mixing, um, folding.
Before I encountered my first run-in with the pastry bag with the plastic nozzle that I’d hopefully inserted correctly, I had to get the pink batter from bowl to bag. Those baking experts showed how easy it was—the same people who could probably pipe blindfolded—insert piping bag in a glass, fold the top over like a cuff, and make sure the nozzle was pointing up rather than down. Also, twist the bottom of the bag a few times so the batter won’t escape. Okay…
Theoretically, easy. I plopped the pastry bag into the glass and added the first scoop of batter with my spatula…but I’d forgotten to make the cuff so the batter got stuck on top and some of it fell on the counter. Way to go, wasting batter and making a mess. Eventually, I got most of it into the bag and the batter started escaping from the bottom, too. I’d be lucky if I managed to make one macaron shell!
My 1st batch of piped macarons
I won’t describe the horror of piping except that part of my face was pink from batter oozing out the top as I tensely gripped it. Some dropped onto my hand. Good thing it wasn’t red! Each of the discs was a different size with only a few of them being round. Getting the batter onto the parchment paper was a messy feat but in the end I managed to get 24 various sized discs onto each tray.
I baked each tray separately and used the bottom oven rack after reading and watching the tales of staying away from the middle rack.
Just out of the oven
The result can be seen to your left.
Itsy bitsy feet on some, a single mega cracked shell, but the taste of the shell was sweet. I added jam rather than attempt to do a buttercream filling which would need to be piped—I really didn’t fancy that word!


 By Lisa Maliga, copyright 2016


